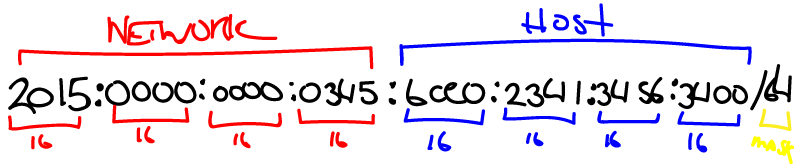
In my last post, I explained how to go about utilizing IPv6 prefix delegation using a Ubiquiti EdgeRouter 4, connected to an AT&T internet router that has IPv6 enabled on both the WAN and the LAN side. Now we’re going to walk through the basic firewall rules you need in place to protect your IPv6 network. And when I say basic, I mean the bare minimum to make sure the entire internet can’t get to your IPv6 devices, because if you’ve finished with the last post, your devices are likely open right now. 😐
Creating Your Main Firewall Rule-sets
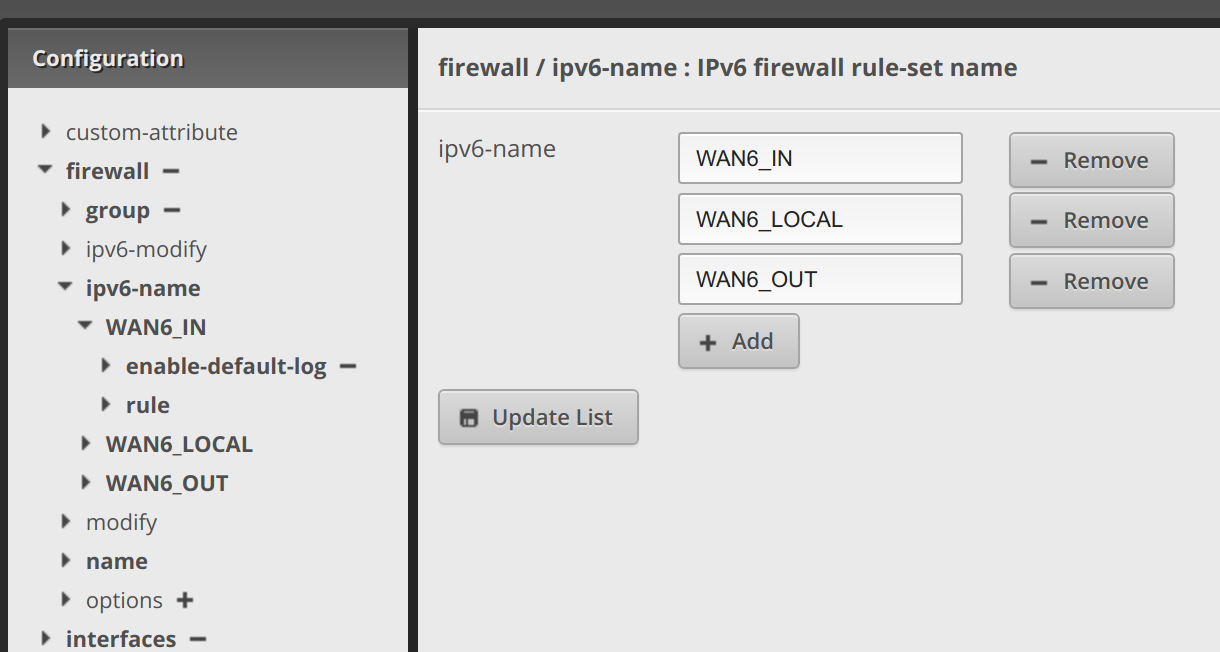
First, you’re going to create two main rule-sets (three if you want to firewall outgoing traffic as well, which I do, but you’ll need to come up with your own rules 😉 ): WAN6_IN and WAN6_LOCAL (WAN6_OUT is optional for outgoing traffic which I personally like to filter). Do this by selecting/dropping down firewall, ipv6-name and add those two or three names/rule-sets mentioned above and shown below; then click Update List:
Keeping Traffic Out By Defining What Comes In – WAN6_IN
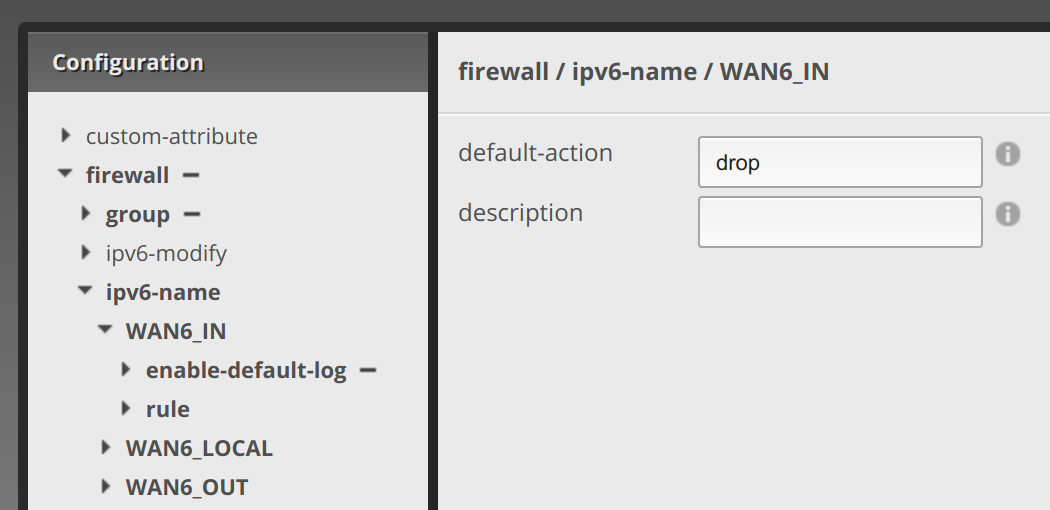
Now, click on WAN6_IN and enter the default-action as drop, as shown below (I also enable default logging by clicking the plus next to enable-default-log, like below, but that’s up to you; I like to know what’s getting bounced in the log):
Now click rule under WAN6_IN, click add and enter the number 10, click add again and enter 15, and then 20, and 30 as below (they can really be 10, 20, 30, 40 if you want, whatever numbers in sequential order technically, but I recommend spacing by tens to have room to add other rules in between them if needed. I had to go back and enter 15 because I forgot this rule when I initially set it up. Also don’t worry about rules 40 and 50, those will be for a follow up post 😉 … annnnnyway). Click Update List:

Now click next to 10 to drop it down and enter accept under action, allow established tcp under description, disable under log, and tcp under protocol (see below):

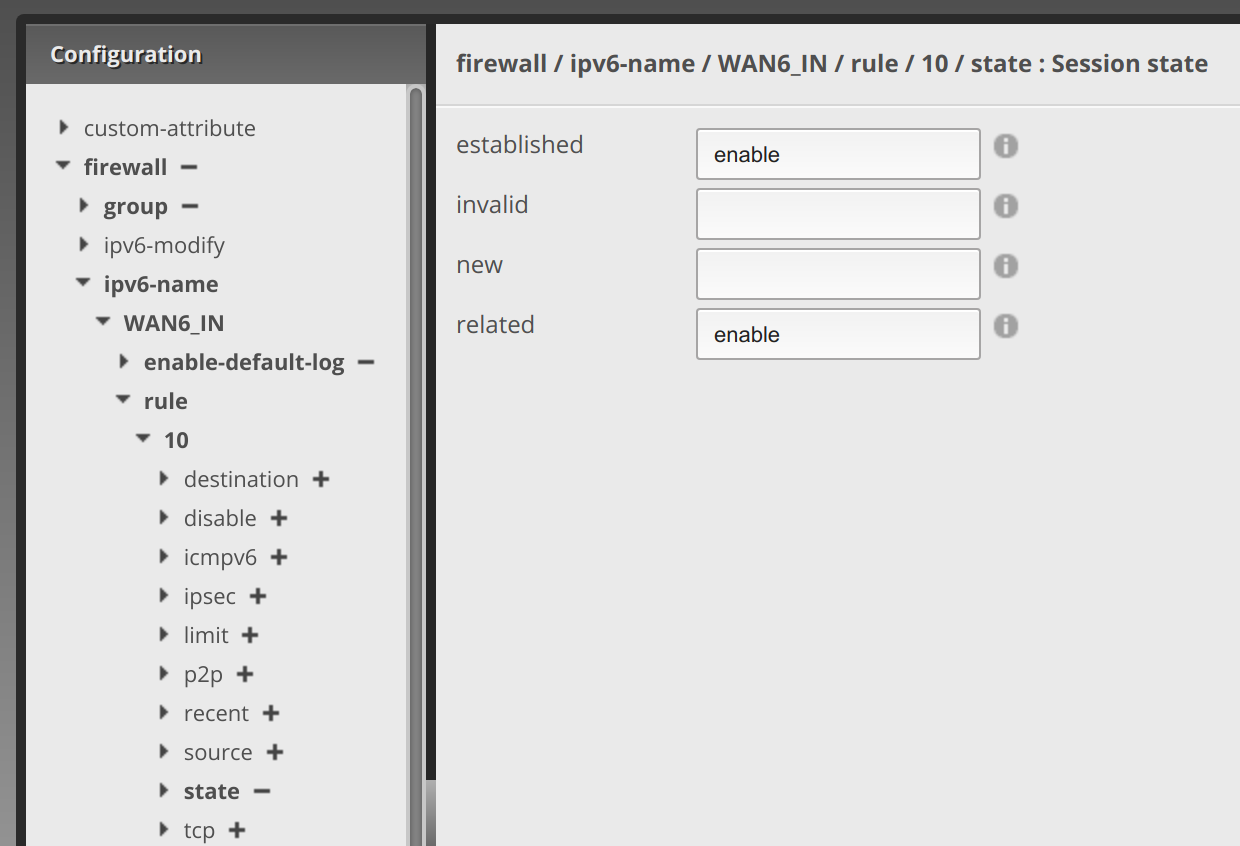
Now click state under the 10 rule, enter enabled under established and enable under related:
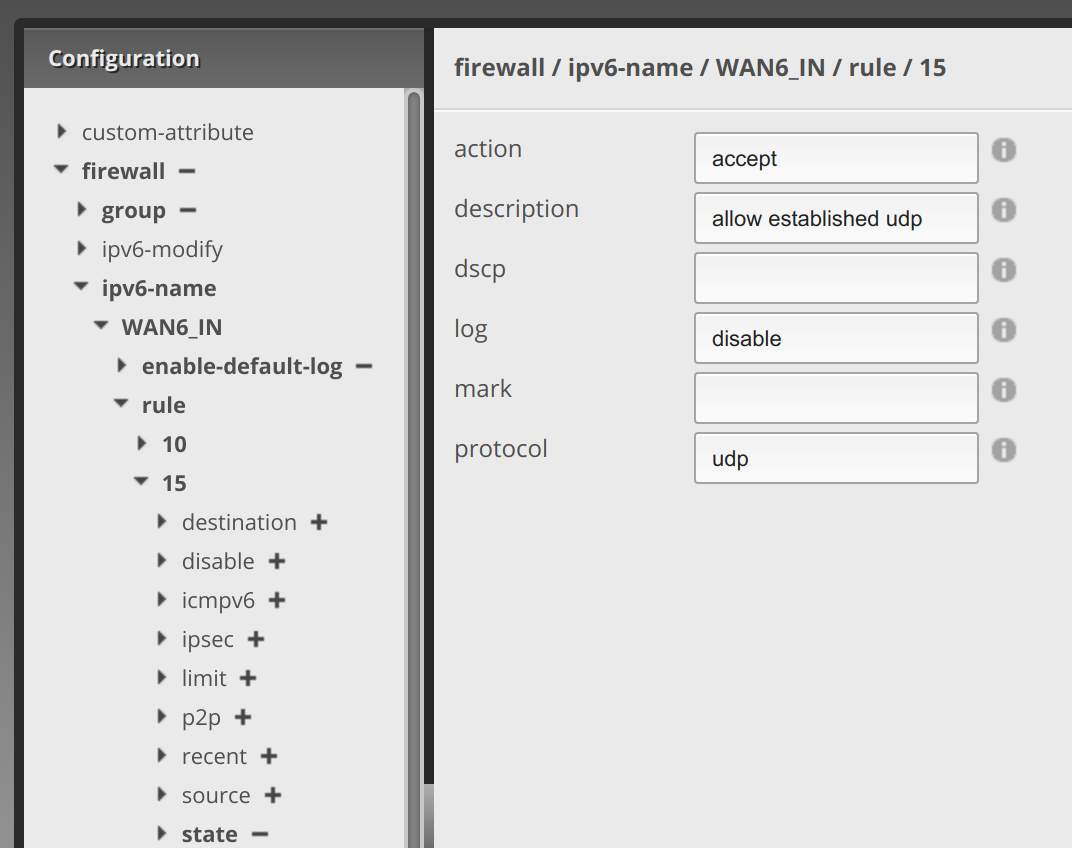
Next we’re going to move to the 15 rule and do something similar (or 20, whatever you labeled the next rule). Click the 15 rule, enter accept in action, allow established udp in description, disable in log, and udp in protocol:
Then drop down state under 15, and enter enable under established and enable under related:

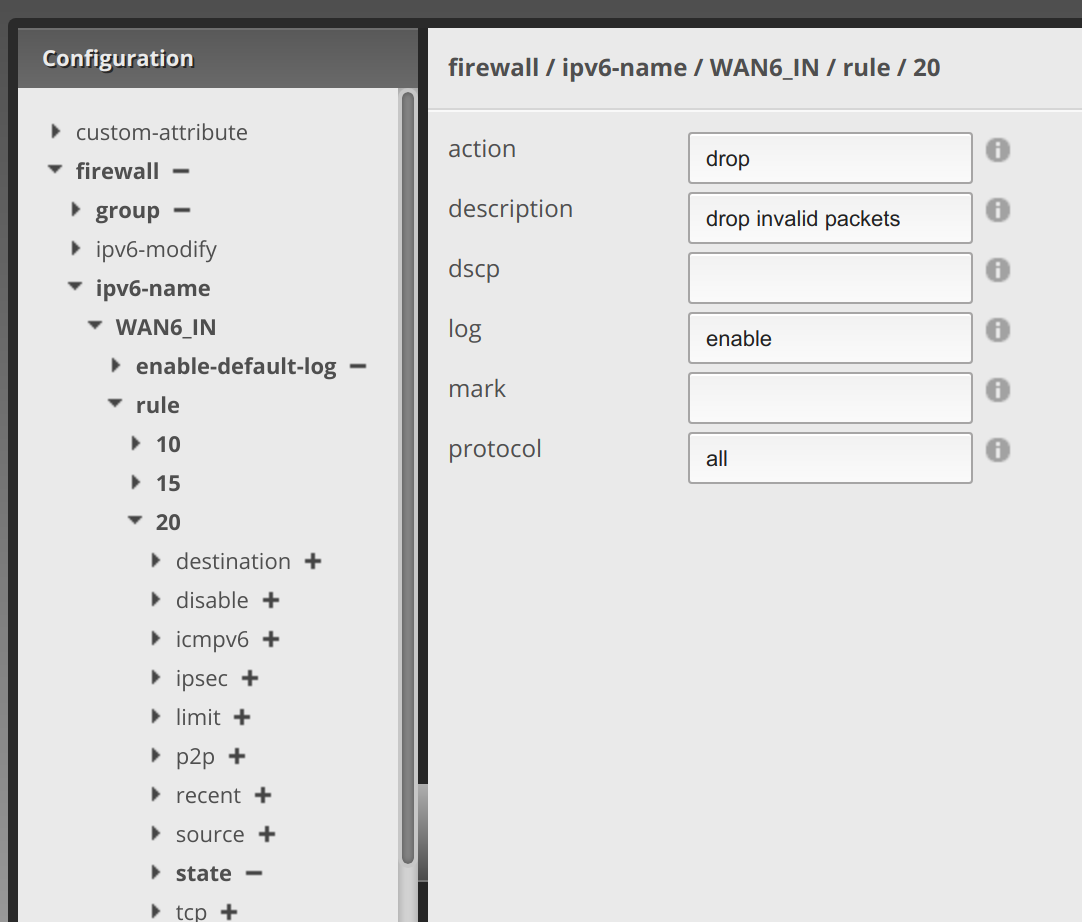
Now drop down rule 20, and enter drop in action, enter drop invalid packets in description, (I personally set enable in log to capture what gets dropped), and all in protocol:
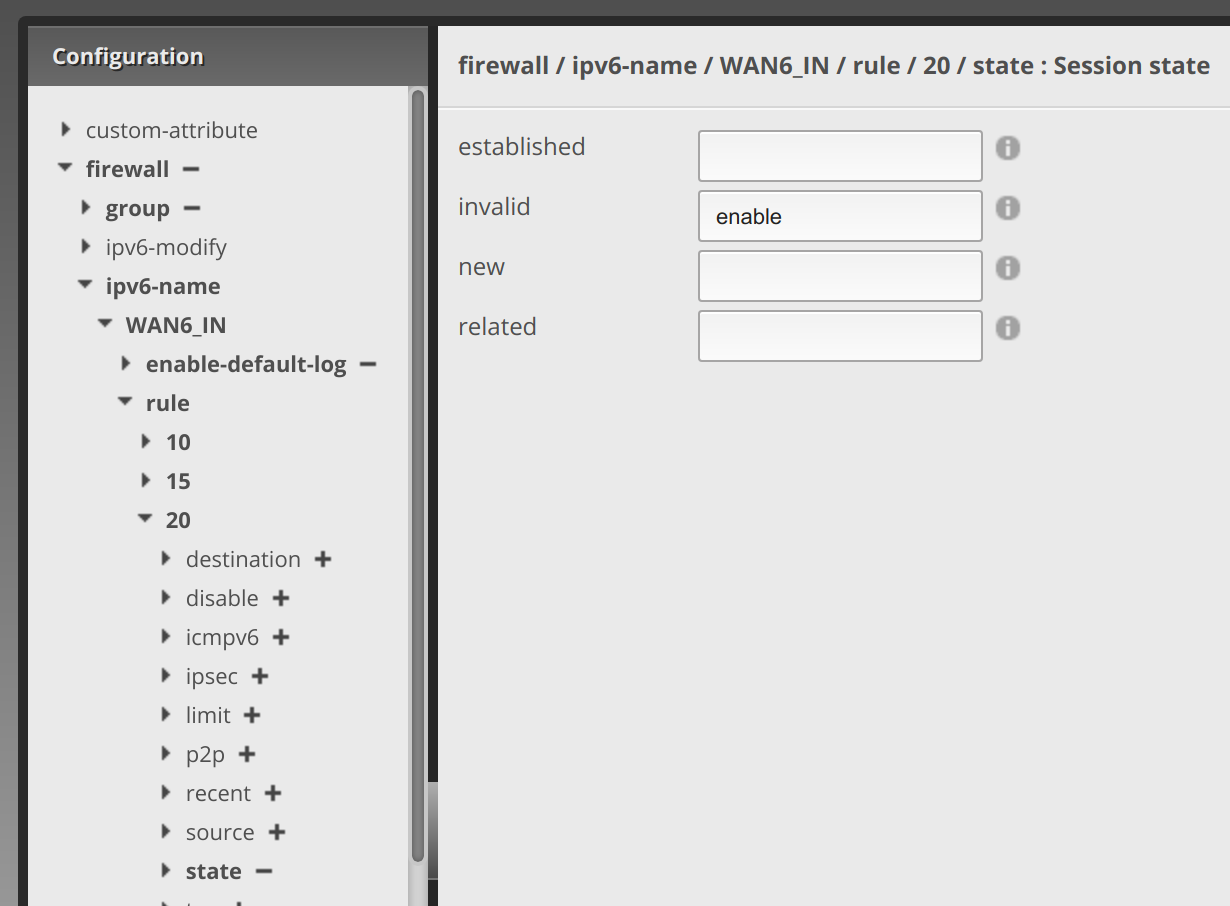
Now drop down state and enter enable in invalid:
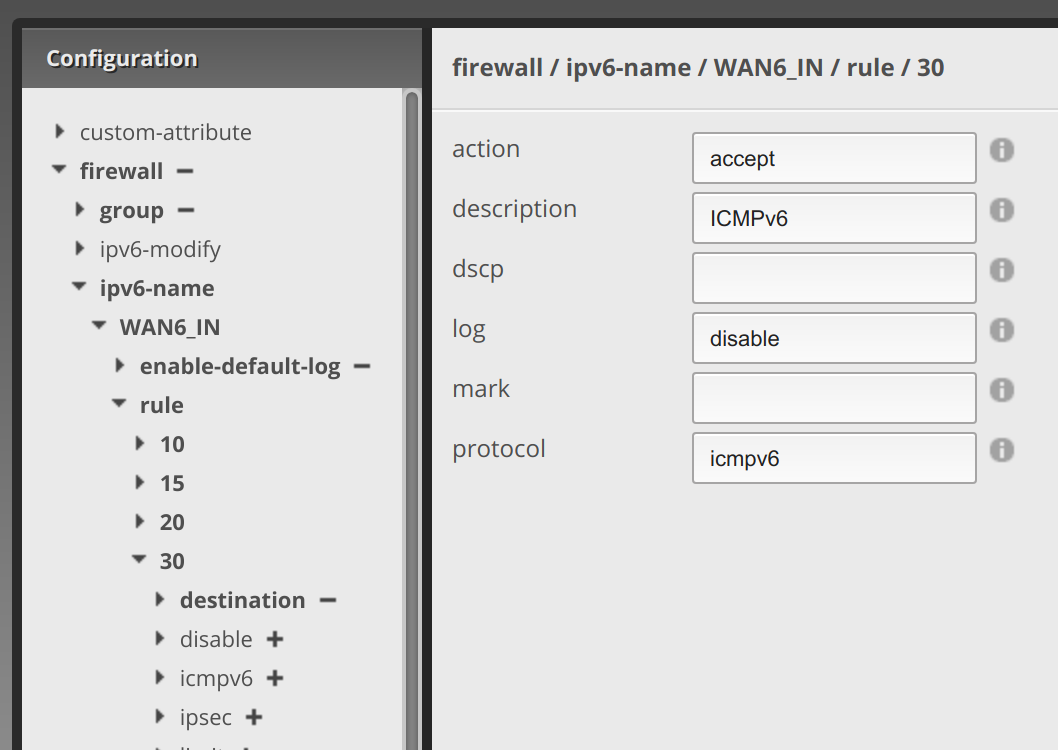
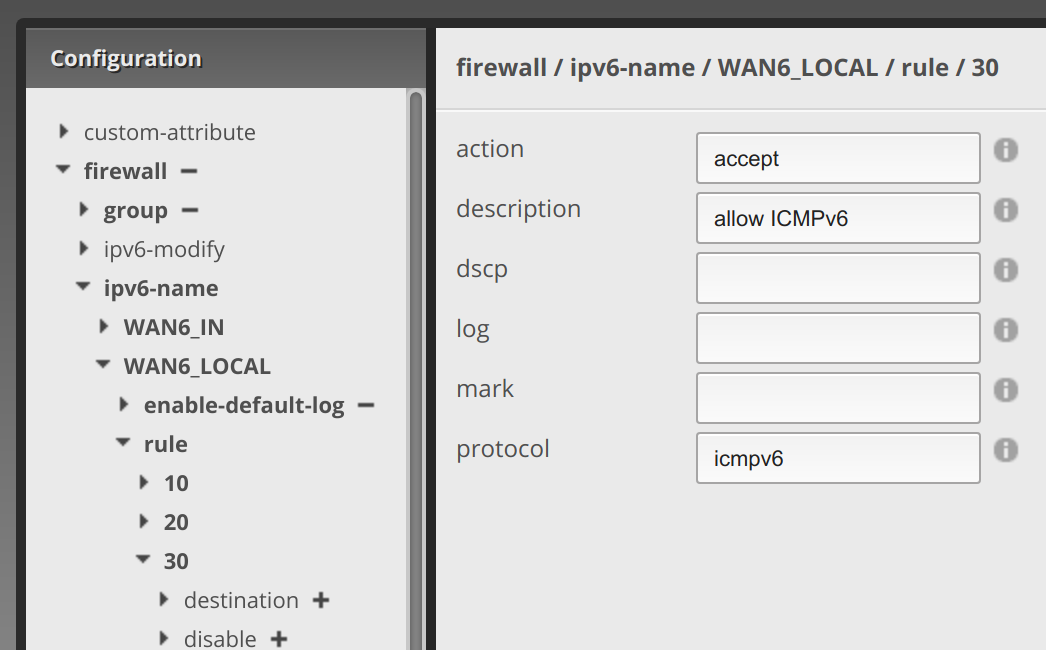
Next we’ll go to the 30 rule and drop it down. Enter accept in action, ICMPv6 in description, disable in log, and icmpv6 in protocol.
Now hit the Preview button, it will have a bunch of stuff in it that you created above, and hit Apply. Assuming everything was done right, it will save. Otherwise you’ll need to fix what was not done correctly.

Defining What Traffic Can Directly Hit the Firewall Itself – WAN6_LOCAL
First step, as with WAN6_IN, default to dropping traffic. Under firewall, ipv6-name, and WAN6_LOCAL, set drop for the default-action (and if you want hit the plus next to enable-default-log):

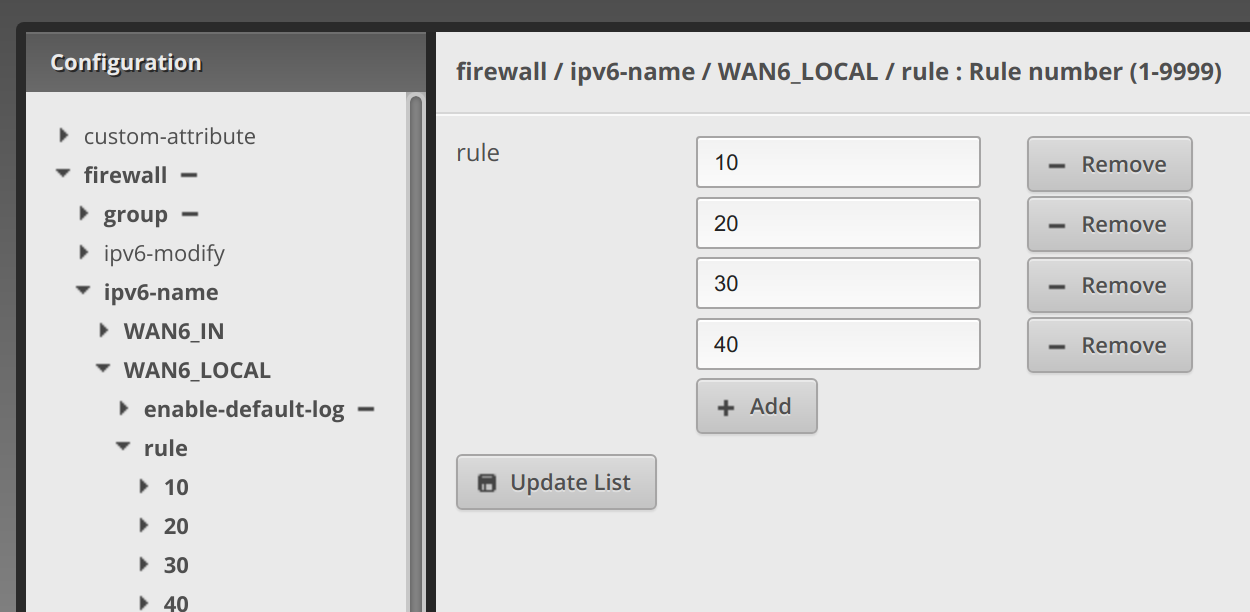
Now click rule under WAN6_LOCAL, click add and enter 10, click add again and enter 20, and 30, and 40. Then click Update List.
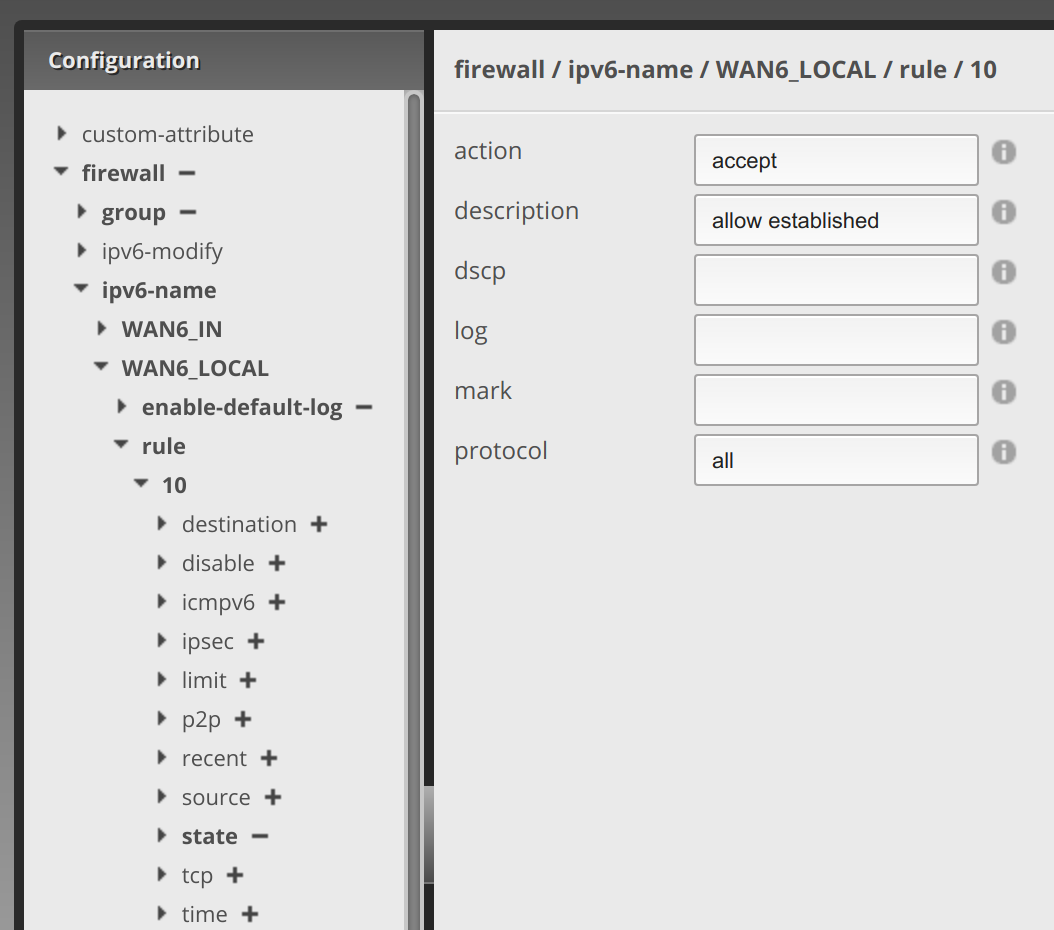
Now click on rule 10, under rule. Enter accept for action, allow established for description, and all for protocol.
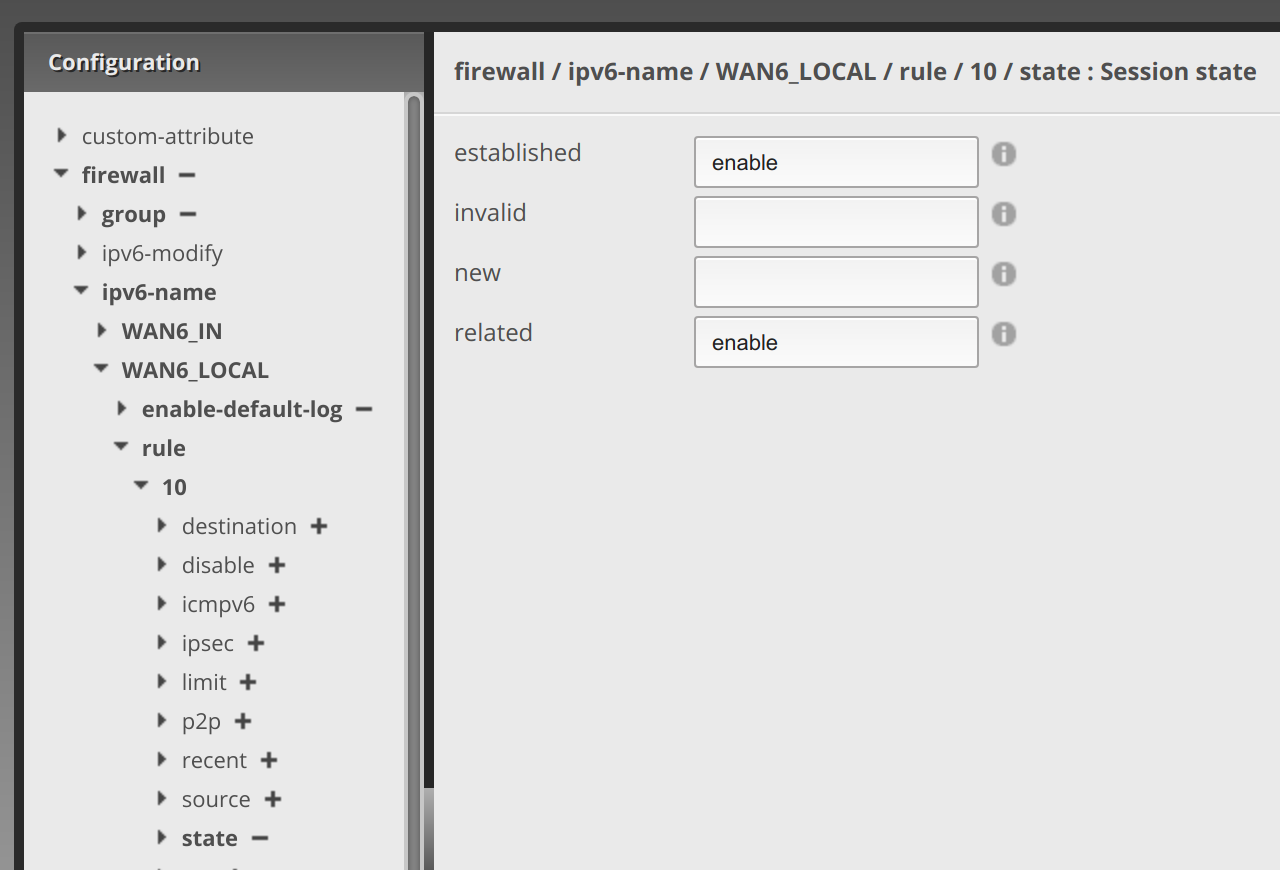
Now click on state under rule 10, and enter enable for established and enable for related.
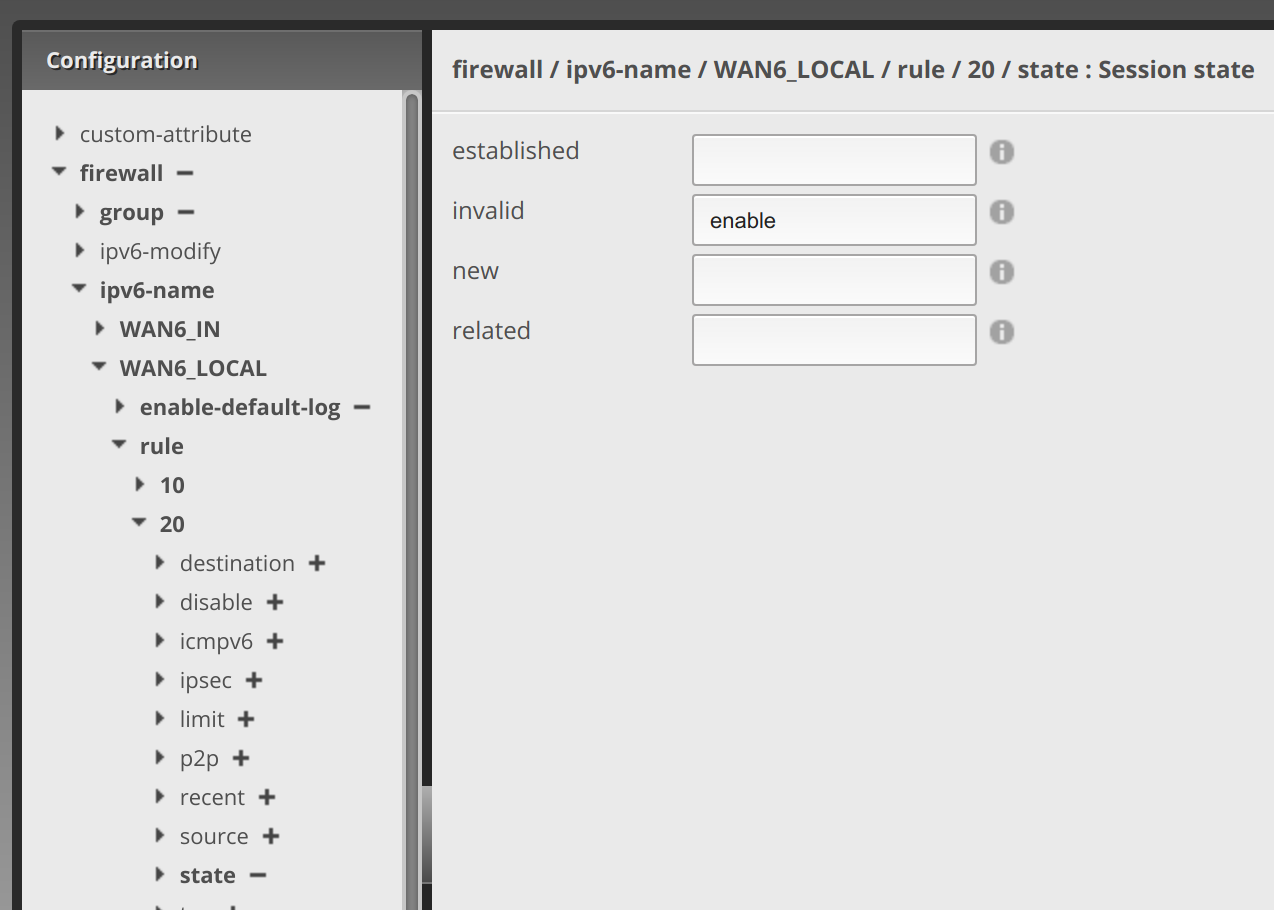
Now click 20 under rule, and enter drop for action, drop invalid packets for description, enable for log (that’s what I did again to watch what gets dropped), and all for protocol.

Now click state under rule 20, and enter enable for invalid.
Click 30 under rule, enter accept for action, allow ICMPv6 for description, and icmpv6 for protocol.
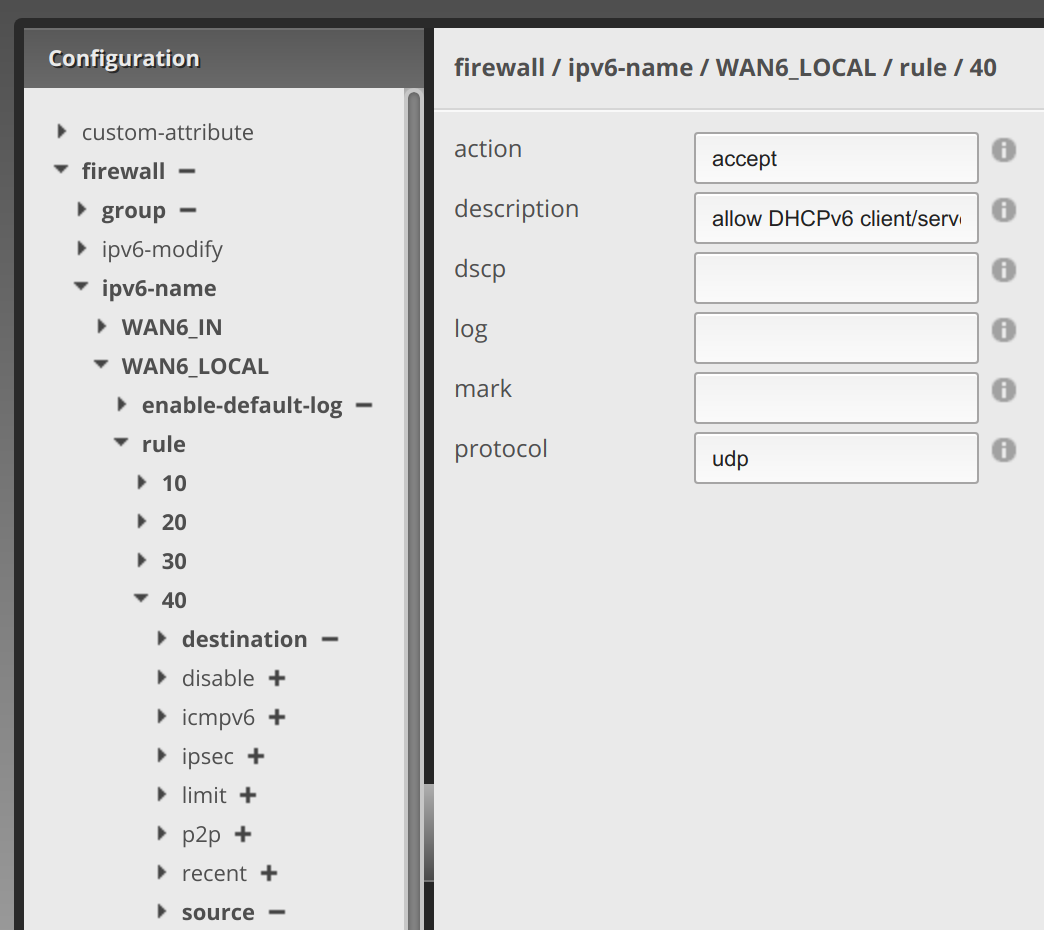
Now click 40 under rule, and enter accept for action, allow DHCPv6 client/server for description, and udp for protocol.
Click destination under 40 and enter 546 for port.

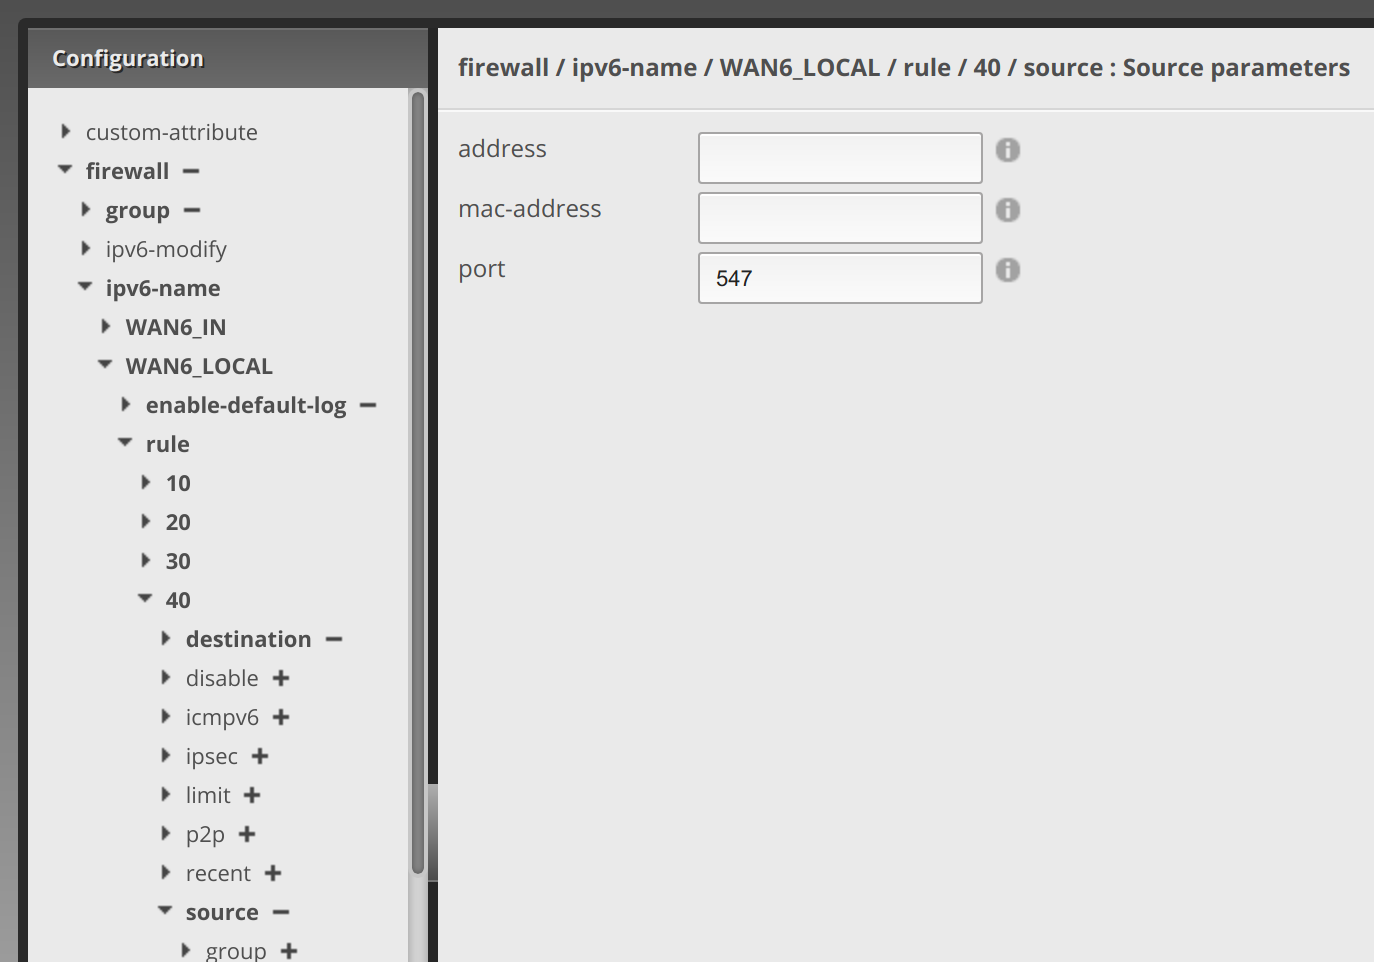
Now click source under 40 and enter 547 for port.
Now hit the Preview button, it will have a bunch of stuff in it that you created above, and hit Apply. Assuming everything was done right, it will save. Otherwise you’ll need to fix what was not done correctly.
Applying the Rule-sets
Simply defining the rule-sets above doesn’t do us any good. We need to apply them. (Much like the actual law, it’s only as good as applied and enforced!)
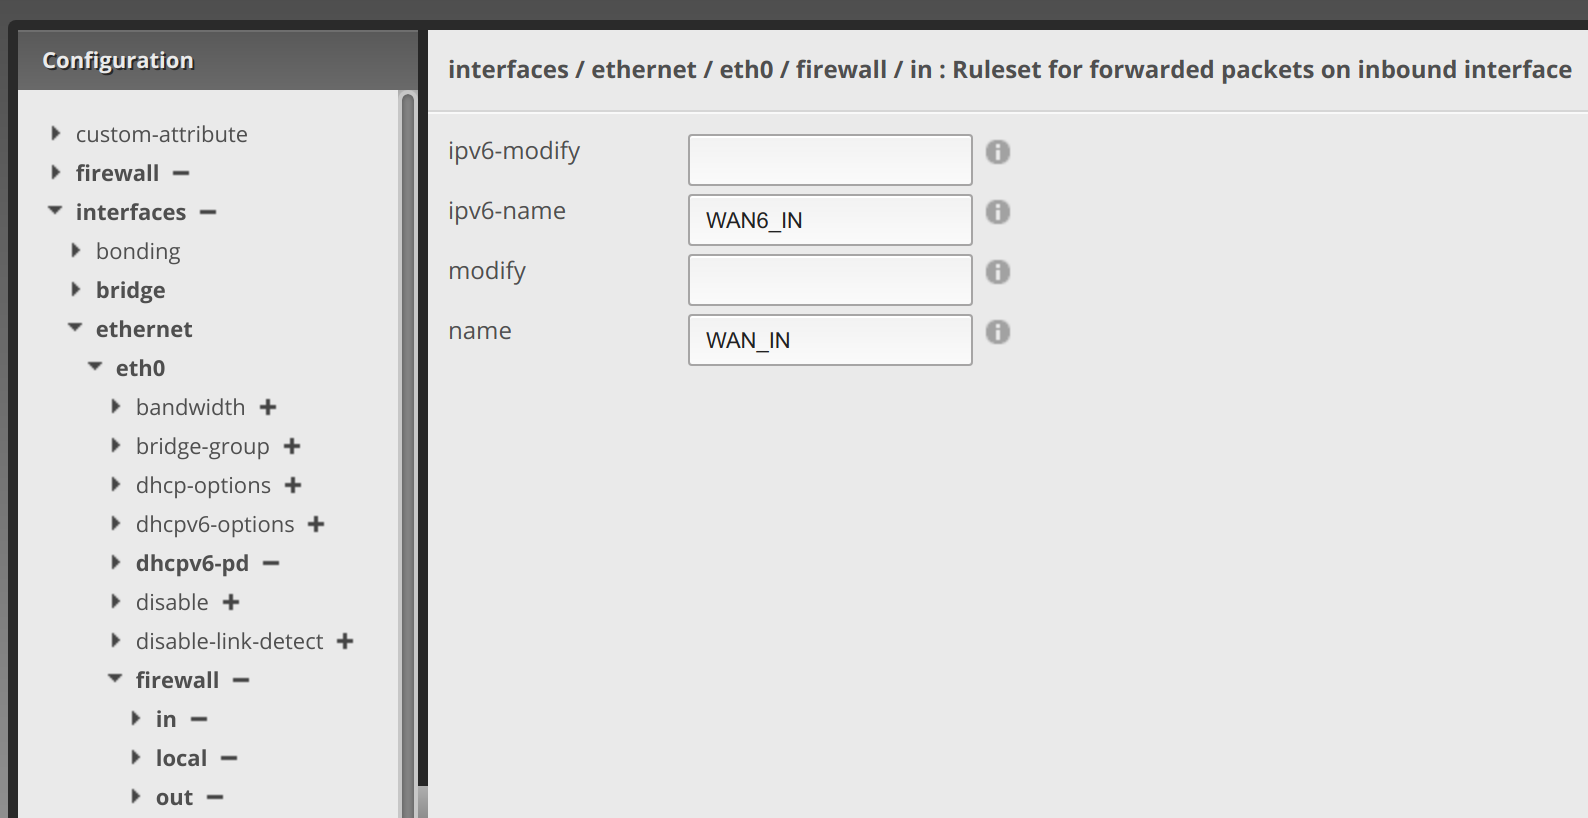
From the top of the Config Tree, click on interfaces, eth0 (or whatever your internet interface is), firewall, in, and enter WAN6_IN in ipv6-name.
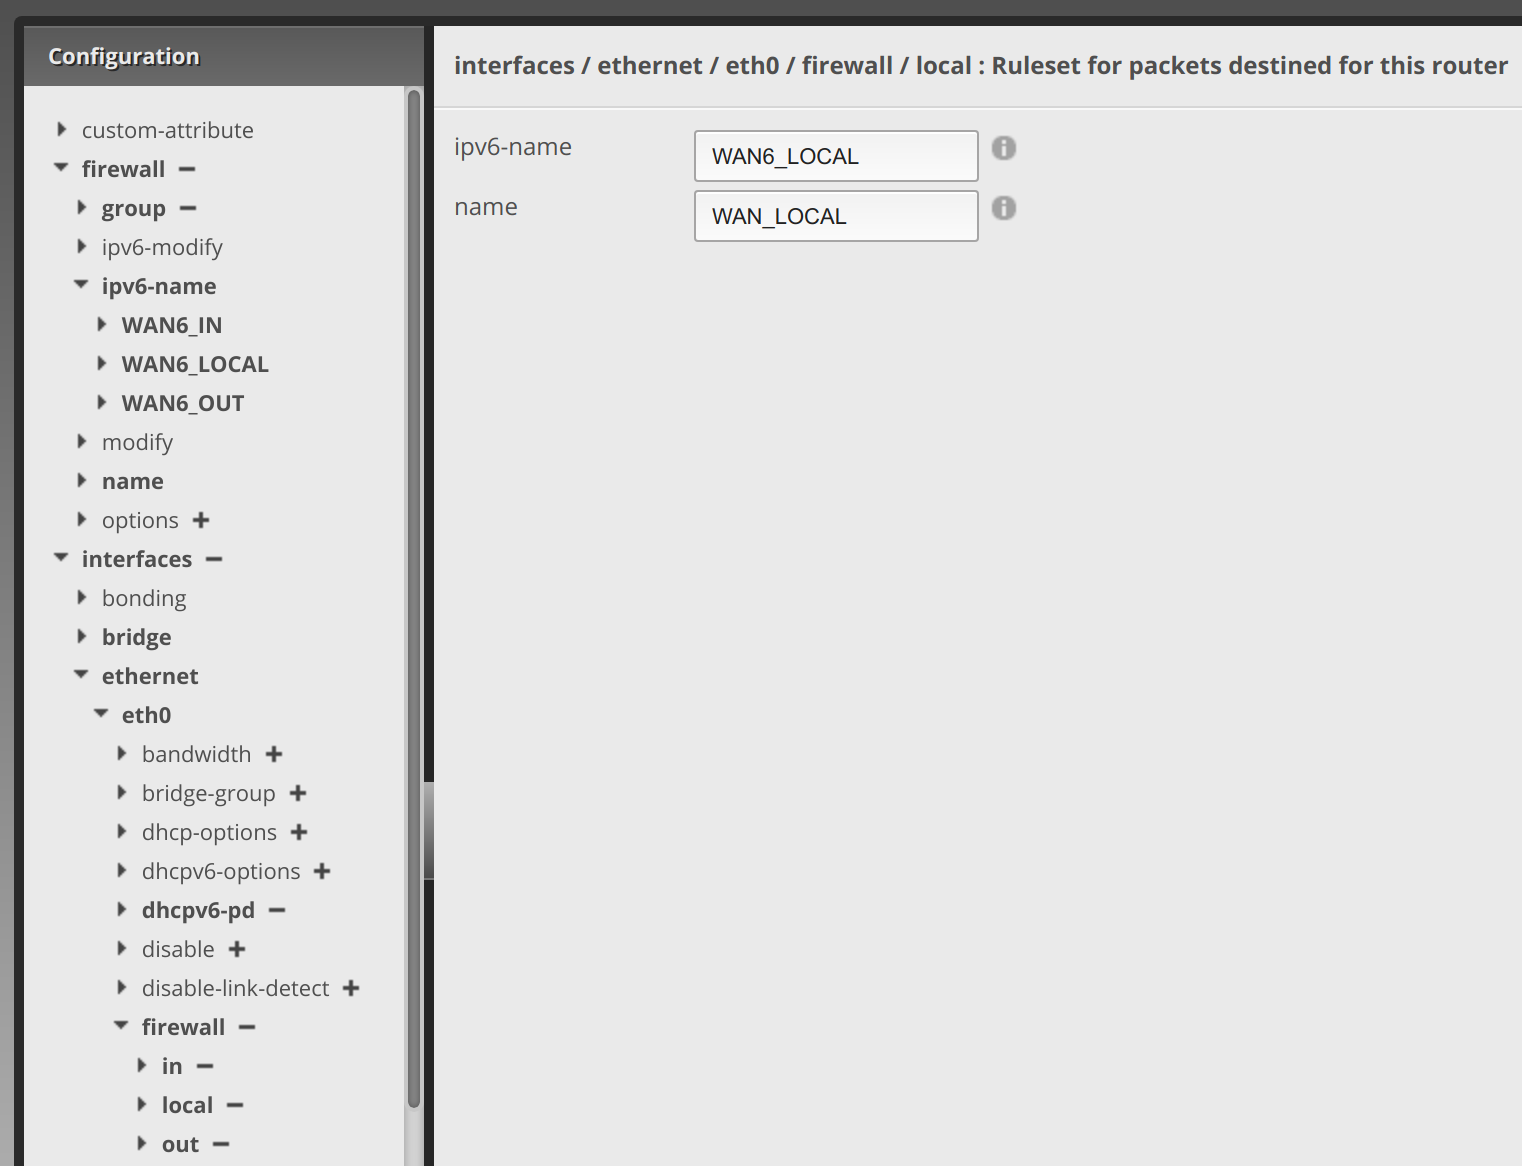
Next click local under firewall, and enter WAN6_LOCAL in ipv6-name.
Now hit the Preview button, it will have the stuff in it that you created above, and hit Apply. Assuming everything was done right, it will save. Otherwise you’ll need to fix what was not done correctly.
Cheers to a new internet!
Now the next step is for Ubiquiti and other vendors to make all of this easy to do in the web interface and make DPI function with IPv6 as well for filtering applications. That would make the transition to IPv6 easier for IT geeks. Just because I can do it in the config or I can do it via command line doesn’t mean I really want to do everything that way just to prove something. Ain’t nobody got time for that! 😉
For my next post, I’ll show you the rules for passing IPv6 traffic through to a web server or other service you’re hosting.
Jeff
Did you create the post showing the rules for passing IPv6 traffic through to a server? I can’t find it
David Westerfield
Sorry just seeing this … basically instead of doing a port forward, you just allow a port through to that IP on the WAN firewall rules.
James
Hi David,
Sorry – I’m a bit new to the edgeOS firewall, can you give me some more details on how to configure that?
Many thanks!
David Westerfield
For starters, you’ll be working in the Config Tree tab at the top. Then just go through the instructions on setting up the port you want to allow in.